
Command pattern standard input
The previous tutorial covered the theory behind the command design pattern and why it is used prolifically for handling input in games. A high level example of how a game handles input was presented and in this tutorial we will have a go at implementing this for our javascript / typescript input framework.
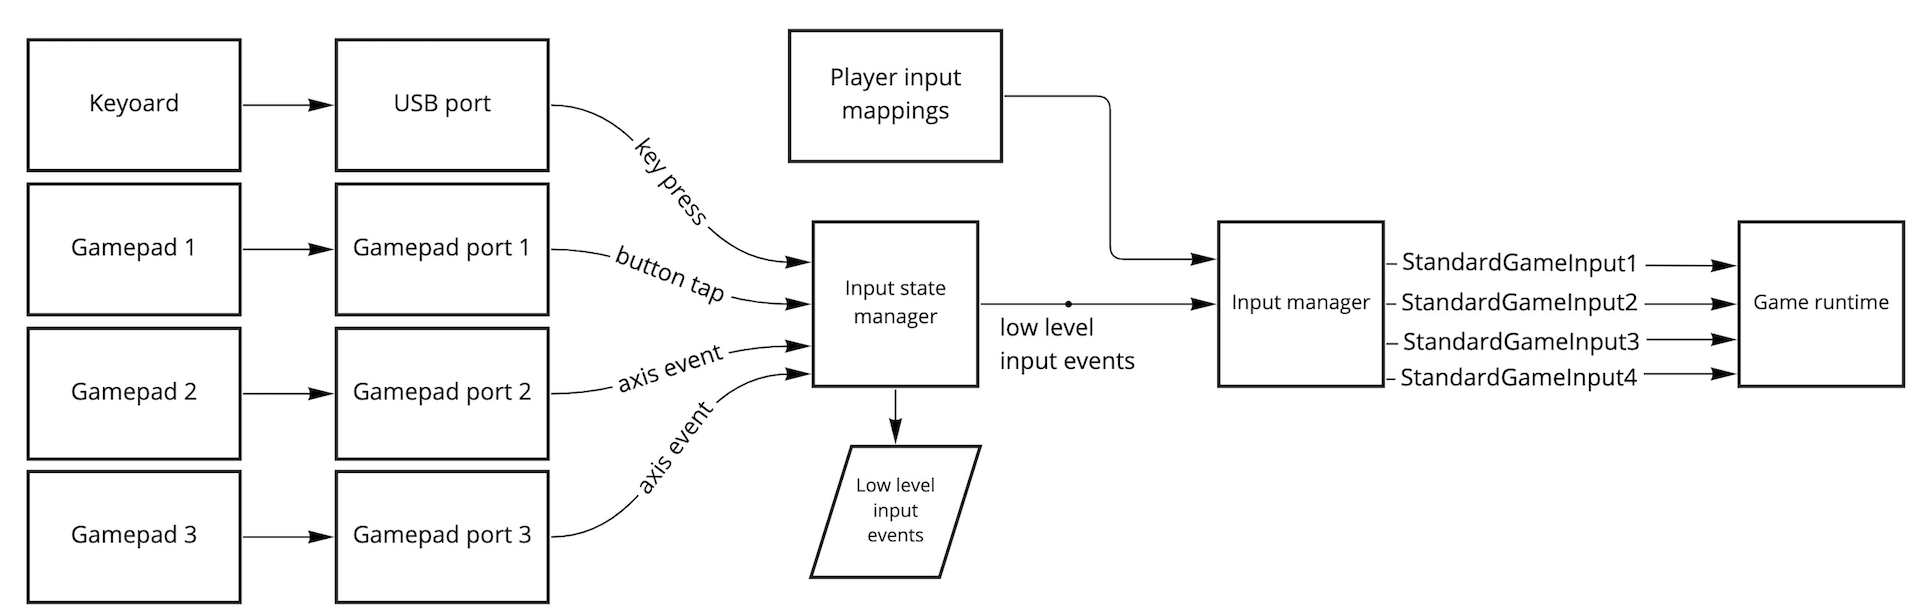
We will use the diagram presented previously below to refactor our current code to implement our own version of the command pattern.
Storing HTML keyboard input event state
As we can see above we need a way to store the low level keyboard input events.
Extend the input types file by adding a new ButtonState and KeyboardState type.
export type ButtonState = 'pressed' | 'not-pressed'

export type KeyboardState =  Record<SupportedKeys, ButtonState>
The ButtonState is a simple string union type representing the state of a button and whether or not it is pressed.
The KeyboardState represents the current state of the keyboard by storing whether each one of its SupportedKey's are pressed or not. It uses typescript's record type which is a key value data structure, in this case the key is of type SupportedKey and the value is of type ButtonState.
Define a default KeybardStateNeutral constant in the input Constants.ts file as below.
export const KeyboardStateNeutral: KeyboardState = {
  w: 'not-pressed',
  a: 'not-pressed',
  s: 'not-pressed',
  d: 'not-pressed',
  f: 'not-pressed',
  g: 'not-pressed',
  h: 'not-pressed',
  j: 'not-pressed'
}
Now we need to ensure the keyboard state is kept up to date. In the KeyboardManager.ts add a new static keyboardState constant as below.
static keyboardState: KeyboardState = KeyboardStateNeutral
We want to take a HTML keyboard event.key which is of type string and try convert it to a SupportedKey type so that we can update the keyboard state.
The below code leverages typescript's input is type syntax to check whether an input meets some conditional criteria by returning a boolean. If the below method returns true then typescript will allow us to treat the key input as a SupportedKey.
The condition below checks if key is one of the SupportedKey types. Add the following method to the KeybaordManager as below.
private static isSupportedKey(key: string): key is SupportedKeys {
  return (key === 'w' || key === 'a' || key === 's' || key === 'd' || key === 'f' || key === 'g' || key === 'h' || key === 'j'  || key === 'ArrowUp' || key === 'ArrowDown' || key === 'ArrowRight' || key === 'ArrowLeft')
}
At the bottom of the keyDown method add the following code to update the keyboard state.
if (KeyboardManager.isSupportedKey(event.key)) {
  KeyboardManager.keyboardState[event.key] = 'pressed'
}
At the bottom of the keyUp method add the following code to update the keyboard state.
if (KeyboardManager.isSupportedKey(event.key)) {
  KeyboardManager.keyboardState[event.key] = 'not-pressed'
}
These two if statements will take care of checking if the current event.key can be cast to a SupportedKey type. If it can we can then update the respective key's value in the keyboardState to match the event that has occurred, pressed for keyDown and not-pressed for keyUp.
In GameRuntime.ts's draw method just under the last context debug log add the following log to show the current keyboard state.
context.fillText(`KS: ${JSON.stringify(KeyboardManager.keyboardState)}`, 0, 60)
Run the game and confirm that when you press a SupportedKey on the keyboard the keyboard state updates the respective key's value to pressed, confirm that letting go switches the value back to not-pressed.
Adding an Input State Manager
The keyboardState provides us a way to access the low level keyboard state.
Because we want to support input types other than keyboard lets encapsulate retrieval of this low level state in a new InputStateManager.
Extend the input types.ts file to include a new InputState type as below.
export type InputState = {
  keyboard: KeyboardState
}
Create a new InputStateManager.ts file in the input directory and add the following code.
export class InputStateManager {
  static getInputs = (): InputState => {

    const keyboardState = KeyboardManager.keyboardState

    return {
      keyboard: keyboardState
    }
  }
}
Defining Standard Game Input
As shown in the diagram above we need a type to represent the high level game action state.
Create a new StandardGameInput type in the input types.ts file as below.
export type DirectionState = -1 | 0 | 1

export type StandardGameInput = {
  axis: {
    discrete: {
      x: DirectionState,
      y: DirectionState
    }
  },
  actions: {
    primary: ButtonState,
    secondary: ButtonState,
    button3: ButtonState,
    button4: ButtonState
  }
}

export type StandardGameInputFourPlayer = {
  player1: StandardGameInput
}
We have copied the DirectionState type added in an earlier tutorial, this is okay, the type is required in both the input framework and PlayerState.
The StandardGameInput type represents all the possible action states our game input supports. The direction in both horizontal and vertical can be negative (-1), neutral (0) or positive (1). The actions are either enabled (pressed) or not (not-pressed).
For the axis I have chosen to add a discrete field which will hold integer values to represent direction. In a following tutorial we will add a new continuous field to represent a typical continuous joystick direction.
The StandardGameInputFourPlayer is an extra wrapping type that will allow us to extend the input system to support up to 4 players in a later tutorial. Even though it only contains one player's input we have named the type StandardGameInputFourPlayer to make refactoring easier.
-2Next add a default StandardGameInputStateNeutral to the input Constants.ts file as below to represent a dormant input.
export const StandardGameInputStateNeutral: StandardGameInput = {
  axis: {
    discrete: {
      x: 0,
      y: 0
    },
  },
  actions: {
    primary: 'not-pressed',
    secondary: 'not-pressed',
    button3: 'not-pressed',
    button4: 'not-pressed'
  }
}
In the games types.ts file update the GameState type's inputs field to include a standardGameInputFourPlayer field set to the StandardGameInputFourPlayer type, the GameState type should match below.
export type GameState = {
  player1: PlayerState,
  inputs: {
    standardGameInputFourPlayer: StandardGameInputFourPlayer,
    playerInputMappings: PlayerInputs
  }
}
Finally update the GameConstants.ts InitialGameState constant to include a field of standardGameInputFourPlayer set to StandardGameInputStateNeutral. The InitialGameState should match below.
export const InitialGameState: GameState = {
  player1: InitialPlayerState,
  inputs: {
    standardGameInputFourPlayer: {
      player1: StandardGameInputStateNeutral
    },
    playerInputMappings: {
      player1: {
        keyboardMapping: KeyboardMappingNeutral
      }
    }
  }
}
Transforming low level keyboard events
Now given we have a keyboardState and the player's keyboard mappings it should be possible to transform the low level keyboardState into a high level StandardGameInput.
Create a new KeyboardTransformer.ts class in the input directory with the below code.
export class KeyboardTransformer {

  private static getButtonState = (keys: SupportedKeys[], keyboard: KeyboardState): ButtonState => {

    const keyStates: ButtonState[] = keys.map(key => {
      const keyState = keyboard[key]
        return keyState
    })

    return keyStates.find(key => key === 'pressed') ? 'pressed' : 'not-pressed'
  }

  private static resolveAxisState = (negativeDirection: ButtonState, positiveDirection: ButtonState): 0 | -1 | 1 => {

    if (negativeDirection === 'pressed' && positiveDirection === 'not-pressed') {
      return -1
    } else if (positiveDirection ==='pressed' && negativeDirection === 'not-pressed') {
      return 1
    } else {
      return 0
    }
  }

  static transform = (keyboard: KeyboardState, playerKeyMappings: GameKeyboardMapping): StandardGameInput => {

    const upActive = KeyboardTransformer.getButtonState(playerKeyMappings.direction.up, keyboard)
    const downActive = KeyboardTransformer.getButtonState(playerKeyMappings.direction.down, keyboard)
    const leftActive = KeyboardTransformer.getButtonState(playerKeyMappings.direction.left, keyboard)
    const rightActive = KeyboardTransformer.getButtonState(playerKeyMappings.direction.right, keyboard)
    const primaryActive = KeyboardTransformer.getButtonState(playerKeyMappings.buttons.primary, keyboard)
    const secondaryActive = KeyboardTransformer.getButtonState(playerKeyMappings.buttons.secondary, keyboard)
    const button3Active = KeyboardTransformer.getButtonState(playerKeyMappings.buttons.button3, keyboard)
    const button4Active = KeyboardTransformer.getButtonState(playerKeyMappings.buttons.button4, keyboard)

    const x = KeyboardTransformer.resolveAxisState(leftActive, rightActive)
    const y = KeyboardTransformer.resolveAxisState(upActive, downActive)

    return {
      axis: {
        discrete: {
          x: x,
          y: y
        }
      },
      actions: {
        primary: primaryActive,
        secondary: secondaryActive,
        button3: button3Active,
        button4: button4Active
      }
    }
  }
}
This is a bit of code but hopefully with some explanation it will become clear what the KeyboardTransformer's responsibility is.
The getButtonState method given an array of SupportedKey and a KeyboardState will determine if at least one of the keys is in the supported keys array is pressed.
The resolveAxisState method given a negative and positive direction (ie left and right, up and down) will return a DirectionState.
The transform method builds up a buttonState for every action we care about, the four directions and four different buttons. It then resolves the axis DirectionState for the horizontal and vertical directions. Finally it returns the results as a StandardGameInput type.
Adding an Input Manager
As shown in the diagram above we need an InputManager that will be responsible for taking the low level InputState and converting it to high level game actions.
Add a new InputManager.ts file in the input directory with the following code.
export class InputManager {

  static getInputs = (playerInput: PlayerInput): StandardGameInput => {
    const inputState: InputState = InputStateManager.getInputs()

    return KeyboardTransformer.transform(inputState.keyboard, playerInput.keyboardMapping)
  }
}
The getInputs method takes a PlayerInput which holds the players keyboard mappings and returns a StandardGameInput.
It retrieves the low level InputState via the InputStateManager and then uses that along with the player keyboard mappings to transform into a StandardGameInput with the help of the KeyboardTransformer.
Updating player state
We can now use our StandardGameInput and current player state to determine the new player state.
Update the Player's getPlayerState method to retrieve the player's new updated position as below.
static getPlayerState = (gameInput: StandardGameInput, currentState: PlayerState): PlayerState => {

  return {
    position: Player.updatePlayerPosition(currentState.position, currentState.direction),
    direction: {
      horizontal: gameInput.axis.discrete.x,
      vertical: gameInput.axis.discrete.y
    },
    bottom: gameInput.actions.primary === 'pressed',
    right: gameInput.actions.secondary === 'pressed',
    left: gameInput.actions.button3 === 'pressed',
    top: gameInput.actions.button4 === 'pressed',
  }
}
Using the new input
From GameRuntime's loop method lets retrieve the input from the InputManager, use it to retrieve the player1State and then update the relevant GameState fields with the result. The loop method should match below.
static loop = (context: CanvasRenderingContext2D, canvasWidth: number, canvasHeight: number) => {
  const inputs = InputManager.getInputs(GameRuntime.gameState.inputs.playerInputMappings.player1)
  const player1State = Player.getPlayerState(inputs, GameRuntime.gameState.player1)

  GameRuntime.gameState.player1 = player1State
  GameRuntime.gameState.inputs.standardGameInputFourPlayer.player1 = inputs

  GameRuntime.draw(context, canvasWidth, canvasHeight, GameRuntime.gameState)
}
Run the game and confirm that the square moves when the current keyboard direction keys are pressed.
Remove old keyboard code
Now that everything is working with our new InputManager we can remove the old code that was directly updating the GameState in the KeybaordManager.
Remove all the player1KeyboardMapping code from the keyDown and keyUp methods. The KeyboardManager's keyDown and keyUp methods should look like below.
private static keyDown = (event: KeyboardEvent) => {
  if (KeyboardManager.isSupportedKey(event.key)) {
    KeyboardManager.keyboardState[event.key] = 'pressed'
  }
}

private static keyUp = (event: KeyboardEvent) => {
  if (KeyboardManager.isSupportedKey(event.key)) {
    KeyboardManager.keyboardState[event.key] = 'not-pressed'
  }
}
Run the app and confirm everything still works. Notice that when we press multiple direction keys quickly the jittering effect is no longer present. This effect was caused because we were updating the state directly and not taking into account the directions equivalent opposite direction when doing so. This means that the gameState.player1.direction.vertical state could be written to multiple times undoing the previous update. Now instead of updating the gameState straight away we are using the resolveAxisState method in the KeyboardTransformer to determine the overall horizontal and vertical, taking into account the left and right and up and down states respectively. This creates a smoother transition for when we hold down multiple directions at once. Note that depending on the game we might want this jitter effect or some other effect, ie old school pacman allows a player to press record key strokes even when pacman can't move in that direction and pacman will move in the desired direction when it next can, it's up to us as game developers to interpret the input state in a way that is conformant to the games desired restrictions.
Summary
Hopefully you made it this far, I admit this tutorial is a bit messy and I think that represents how intertwined and coupled the original code was. The code is in a good generic state now though and the rest of this course is smooth sailing I assure you!
Now that we have our StandardGameInput pattern in place we will explore in the next tutorial how easy it is to adapt this pattern to fit supporting the Gamepad as an input.
