
Intro
In this tutorial we are going to cover handling mouse input events which will include the following concepts and a practical example to tie them all together.
- Mouse event listeners
- Mouse event properties
- Screen vs Offset vs Page vs Client positions
- Canvas position translation
- Canvas mouse event example
Mouse event listeners
Below are the most common mouse event listeners.
- mouseenter: This event is triggered when the mouse cursor position is moved inside the target element.
- mouseleave: This event is triggered when the mouse cursor position is moved outside the target element.
- mousemove: This event is triggered when the mouse cursor position is changed when inside the target element.
- mousedown: This event is triggered when any mouse button is pressed.
- mouseup: This event is triggered when any mouse button is released.
Mouse event properties
When a mouseevent occurs properties are attached via a MouseEvent type that help describe the nature of the event. We will go over most of the common events that will be used for html canvas game design.
The mouse position properties below can seem similar as we'll observe in the example but they serve distinct use cases which are described below.
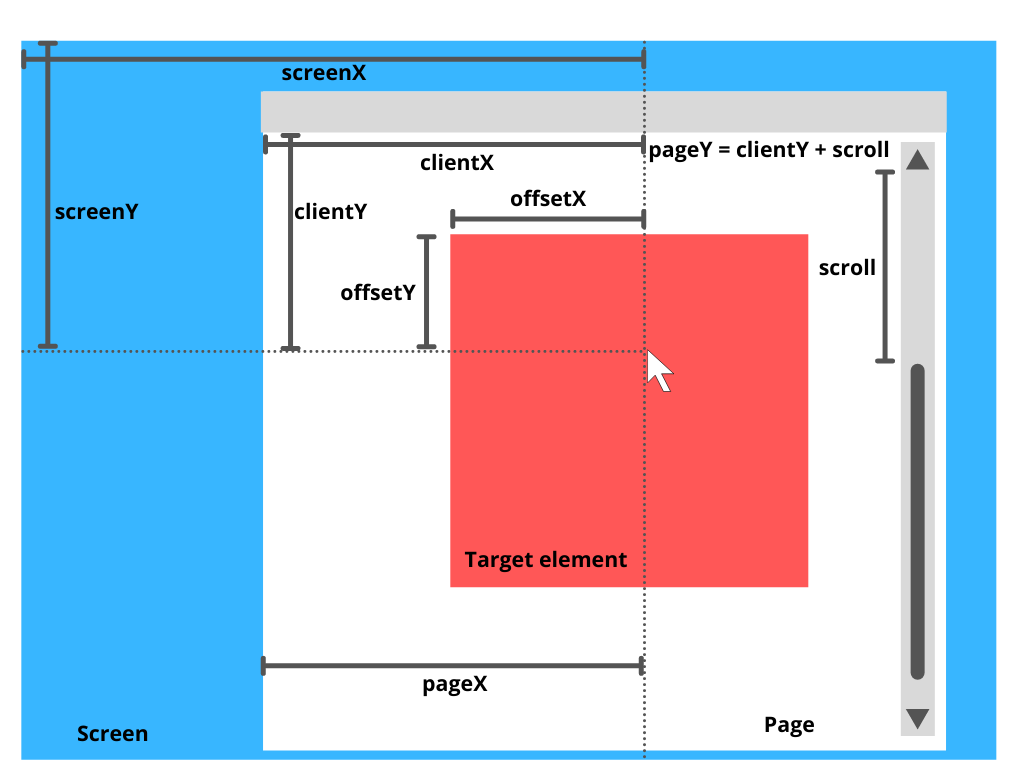
screenX and screenY property
The screenX and screenY properties return the mouse cursors position relative to the devices screen.
clientX and clientY
The clientX and clientY properties return the mouse cursors position relative to the application's viewport, this does not include any scrolling overflow.
x and y properties are alias for the clientX and clientY property.
pageX and pageY
The pageX and pageY properties return the mouse cursors position relative to the current html document. This includes the distance the page has been scrolled horizontally or vertically.
offsetX and offsetY
The offsetX and offsetY properties return the mouse cursors position relative to the target element the event was added to.
movementX and movementY
The movementX and movementY properties return the relative position of the mouse cursor between the current and previous mousemove events firing.
button
The button property returns a number which relates to a single button.
- 0: Main button pressed, usually the left button or the un-initialised state
- 1: Auxiliary button pressed, usually the wheel button or the middle button (if present)
- 2: Secondary button pressed, usually the right button
buttons
The buttons property returns a number which helps determine when multiple buttons have been pressed or released during a particular mouse event.
Each button is assigned a weighted value that doubles in magnitude as below.
- 0: No button
- 1: Primary button (usually the left button)
- 2: Secondary button (usually the right button)
- 4: Auxiliary button (usually the mouse wheel button or middle button)
The buttons value equals the sum of all of the weighted button values that are contributing to the current mouse event.
The buttons assigned weighted values double so that we can determine given a mouse event which particular buttons contributed to it. For example if buttons is equal to 5 we know that the only combination that adds to 5 is when the primary and auxiliary button are contributing to the event.
Mouse screen diagram
You can use this handy diagram as a guide to tell the different mouse coordinates apart.
Mouse event canvas example
This tutorial will use the typescript-html5-game-loop-starter project as a base. If you need help setting that up or a refresher on the different files head over to typescript game loop project setup otherwise if you're familar with the code and zip file can be found at typescript-html5-game-loop-starter, unzip, change to the project's root directory and open the code in your favourite IDE.
In this example we will go over all of the above mentioned mouse event related properties in a detailed example.
Set gameState
Update GameStateType.ts in the types directory as below.
type GameState = {
  mouseInside: boolean,
  mouseDown: boolean,
  button: number,
  buttons: number,
  movementX: number,
  movementY: number,
  position: {
    screenX: number,
    screenY: number,
    clientX: number,
    clientY: number,
    pageX: number,
    pageY: number,
    offsetX: number,
    offsetY: number,
    canvasX: number,
    canvasY: number
  }
}
The GameState type will capture all of the properties mentioned above (except canvasX and canvasY which are discussed below) so that we can interact with and display them on the canvas.
The position related properties have been grouped into their own field.
The mouseInside property is a boolean that will represent whether the mouse cursor is inside the canvas.
The mouseDown property is a boolean that will represent whether a mouse button is currently pressed.
Next inside GameRuntime.ts we will update the gameState static constant in the GameRuntime class as below.
static gameState: GameState = {
  buttons: 0,
  button: 0,
  mouseInside: false,
  mouseDown: false,
  movementX: 0,
  movementY: 0,
  position: {
    canvasX: 0,
    canvasY: 0,
    clientX: 0,
    clientY: 0,
    screenX: 0,
    screenY: 0,
    pageX: 0,
    pageY: 0,
    offsetX: 0,
    offsetY: 0
  }
}
The above code sets an initial GameState with some default properties. Add the below code to the draw method to draw onto the screen the respective hardcoded mouse properties.
context.fillText(JSON.stringify({screenX: gameState.position.screenX, screenY: gameState.position.screenY} , null, 0), 0, 40)
context.fillText(JSON.stringify({offsetX: gameState.position.offsetX, offsetY: gameState.position.offsetY} , null, 0), 0, 60)
context.fillText(JSON.stringify({clientX: gameState.position.clientX, clientY: gameState.position.clientY} , null, 0), 0, 80)
context.fillText(JSON.stringify({pageX: gameState.position.pageX, pageY: gameState.position.pageY} , null, 0), 0, 100)
context.fillText(JSON.stringify({canvasX: gameState.position.canvasX, canvasY: gameState.position.canvasY} , null, 0), 0, 120)
context.fillText(JSON.stringify({mouseDown: gameState.mouseDown, mouseInside: gameState.mouseInside} , null, 0), 0, 140)
context.fillText(JSON.stringify({movementX: gameState.movementX, movementY: gameState.movementY} , null, 0), 0, 160)
context.fillText(JSON.stringify({button: gameState.button} , null, 0), 0, 180)
context.fillText(JSON.stringify({buttons: gameState.buttons} , null, 0), 0, 200)
Run the app and you should see the default hard-coded properties on the gameState displayed on the canvas.
Triggering Mouse Events
Add the below code to the GameRuntime class.
static setPosition = (event: MouseEvent) => {

  GameRuntime.gameState.position.clientX = event.clientX
  GameRuntime.gameState.position.clientY = event.clientY
  GameRuntime.gameState.position.pageX = event.pageX
  GameRuntime.gameState.position.pageY = event.pageY
  GameRuntime.gameState.position.offsetX = event.offsetX
  GameRuntime.gameState.position.offsetY = event.offsetY
  GameRuntime.gameState.position.screenX = event.screenX
  GameRuntime.gameState.position.screenY = event.screenY
  GameRuntime.gameState.movementX = event.movementX
  GameRuntime.gameState.movementY = event.movementY
}

static setButton = (event: MouseEvent) => {
  GameRuntime.gameState.button = event.button
  GameRuntime.gameState.buttons = event.buttons
}

static mouseEnter = (event: Event) => {
  GameRuntime.gameState.mouseInside = true
  GameRuntime.setPosition(event as MouseEvent)
}

static mouseLeave = (event: Event) => {
  GameRuntime.gameState.mouseInside = false
  GameRuntime.setPosition(event as MouseEvent)
}

static mouseMove = (event: Event) => {
  GameRuntime.setPosition(event as MouseEvent)
}

static mouseUp = (event: Event) => {
  GameRuntime.gameState.mouseDown = false
  GameRuntime.setButton(event as MouseEvent)
}

static mouseDown = (event: Event) => {
  GameRuntime.gameState.mouseDown = true
  GameRuntime.setButton(event as MouseEvent)
}
The code above defines methods we will use to handle the various mouse events.
The setPosition method takes a MouseEvent and sets all of the position based properties on the gameState relating to that event.
The setButton method groups updating button related properties for a MouseEvent.
The other methods update relevant properties in the gameState directly or call setPosition and setButton to do so.
Next we will connect our methods above as handlers to the relevant mouse events.
Add the following mouse event listeners to GameRuntime's initialise method as below.
canvas.addEventListener('mouseenter', GameRuntime.mouseEnter)
canvas.addEventListener('mouseleave', GameRuntime.mouseLeave)
canvas.addEventListener('mousemove', GameRuntime.mouseMove)
canvas.addEventListener('mousedown', GameRuntime.mouseDown)
canvas.addEventListener('mouseup', GameRuntime.mouseUp)
This will add the relevant event listeners required to update the gameState.
Refresh the app in the browser and move your mouse cursor onto the canvas. You should now see the relevant mouse event properties update.
Test your understanding of the various mouse event properties by validating that the canvas outputs behave as you would expect.
mouseInsideshould reflect whether the cursor is inside the canvas or not.- Try moving the cursor fast and to the left then stop. Does the
movementXandmovementYvector represent the change in position? - Generally the
clientandpageproperties will appear the same. Shrink the window so that there is a vertical or horizontal scroll overflow and move the page down or accross to confirm they are different. - Tap a mouse button and check that the
mouseDown,buttonandbuttonsproperties update as expected. - Move the cursor to the left edge of the canvas and check the offset property.
Tracking the cursor on the canvas
We are going to add some interaction using the offset property to make a square follow our cursor around.
You may have noticed the offset property can be negative. First lets add the clamp method below to fix our offset to a given range. The clamp method takes a value as well as a min and max and will return the value if it's between the min and max and otherwise it will return the min or max value depending which threshold it has crossed.
static clamp = (num: number, min: number, max: number) => Math.min(Math.max(num, min), max);
Overwrite the offsetX and offsetY setter lines in the setPosition method to use the clamp method as below.
    GameRuntime.gameState.position.offsetX = GameRuntime.clamp(event.offsetX, 0, GameRuntime.canvas.getBoundingClientRect().width)
    GameRuntime.gameState.position.offsetY = GameRuntime.clamp(event.offsetY, 0, GameRuntime.canvas.getBoundingClientRect().height)
Add the following lines to the draw method.
context.fillStyle = gameState.mouseDown ? 'red' : 'black'
context.fillRect(gameState.position.offsetX, gameState.position.offsetY, 50, 50)
Here we are setting the fillStyle colour to red when a mouse button is being pressed and black when no buttons are pressed.
We are also drawing a rectangle to the screen based on the offset gameState position, remember this is the mouse cursor position relative to the target element, in this case the canvas.
Refresh the app in the browser and move the cursor around inside, is a black square chasing the cursor? Press a button, does the square change colour?
You may notice that when you move the cursor to the right edge of the canvas the square doesn't follow all the way, why is that?
The offset property hints at the problem here. When the cursor is at the right edge of the canvas the offset is equal to the size of the html element not the canvas width! If these values are different the offset won't be a perfect measurement for where to draw the square on our canvas.
In our case the canvas width is 1024 and the canvas html element varies depending on the browser window size. We will look at a way to calculate an accurate cursor position with relation to the canvas next.
Canvas size vs html element size
Add the following code to the draw method.
context.fillText(JSON.stringify({width: canvas.width, height: canvas.height} , null, 0), 0, 220)
context.fillText(JSON.stringify({clientWidth: canvas.getBoundingClientRect().width, clientHeight: canvas.getBoundingClientRect().height} , null, 0), 0, 240)
The getBoundingClientRect() method on the canvas returns an object with various values relating to the canvas, in particular we care about the width and height property as this represents the canvas html element width and height.
Run the app and verify that the width and clientWidth values are different.
Add the following method to GameRuntime class.
static getMouseCanvas = () => {
  var rec = GameRuntime.canvas.getBoundingClientRect();
  const x = ((GameRuntime.gameState.position.offsetX) * GameRuntime.canvas.width) / (rec.width)
  const y = ((GameRuntime.gameState.position.offsetY) * GameRuntime.canvas.height) / (rec.height)
  return { x: x, y: y };
}
The above method determines the canvasX and canvasY coordinates of the mouse cursor.
We can use the offset and the getBoundingClientRect property to determine the ratio of where our cursor is in the x and y direction.
We take a ratio of the offsetX / GameRuntime.canvas.getBoundingClientRect().width to find a percentage of where our cursor is within the canvas element. Then we can take this percentage and multiple it by the canvas.width to determine the canvasX. A similar method is used to determine canvasY.
Add the following code to the end of our setPosition method.
const canvasPosition = GameRuntime.getMouseCanvas()

GameRuntime.gameState.position.canvasX = canvasPosition.x
GameRuntime.gameState.position.canvasY = canvasPosition.y
This will use the calculated getMouseCanvas() position and set the gameState canvasX and canvasY properties to it.
Run the app and verify that the square follows your cursor to the very right edge of the canvas.
Note: Adding padding or a border style to the canvas via html style attributes will change the dimensions of the getBoundingClientRect() method so it's best to use a div container around the html canvas to style it.
Summary
Being able to identify mouse events and accurately represent their position on a canvas is important for any game that uses a mouse as an input.
